I needed to perform an Alde fluid change and wanted to install an inline pump, which Alde had already told me I could perform as an addition and leave both pumps in the circuit.
I ordered from the internet, a piece of straight Alde rubber hose, a 90 degree angled piece of hose, a rubber blanking disc for the header tank, some hose spring clips and of course, the pump itself. The extra bits and pieces were to facilitate re-working the connections once the pump was in place.
I bought 25 litres of deionised water and 7l of Comma Xstream G40 from our local car parts shop.
Things started badly. The drain plug is located directly above the motor mover so access was difficult and no chance to put a bucket beneath. I wrapped the motor mover in cling film and removed the spring clip, having prepared a small section of flexible hose to place over the drain hose after plug removal.
I was expecting quite a lot of resistance with the drain plug but no, a simple tug and bright blue liquid gushed out all over the motor mover (thank goodness for the cling film). By the time I got the flexi pipe over the drain I managed to collect a few cms in the bottom of a bucket.
Problem one – I now don’t know how much liquid is in the system although I’d guessed about 2 to 3 litres gushed out.
Where was the rest of it. Aha, must be air-locked so I undo the bleed screw on the towel radiator and instead of air rushing in, blue liquid exits over the bathroom carpet. Fortunately, it doesn’t appear to stain and I was able clean it up. A few more drips in the bucket.
Next to the header tank and out with the pump, a few more drips in the bucket. So, where is the rest of the liquid and why does it leak out of the towel radiator?
Tilt the van. Backwards and forwards. Shake it a little. A few more dribbles. I’m getting hacked off now so I start removing cushions and looking at the system and here’s what I find (click on the image for full size).
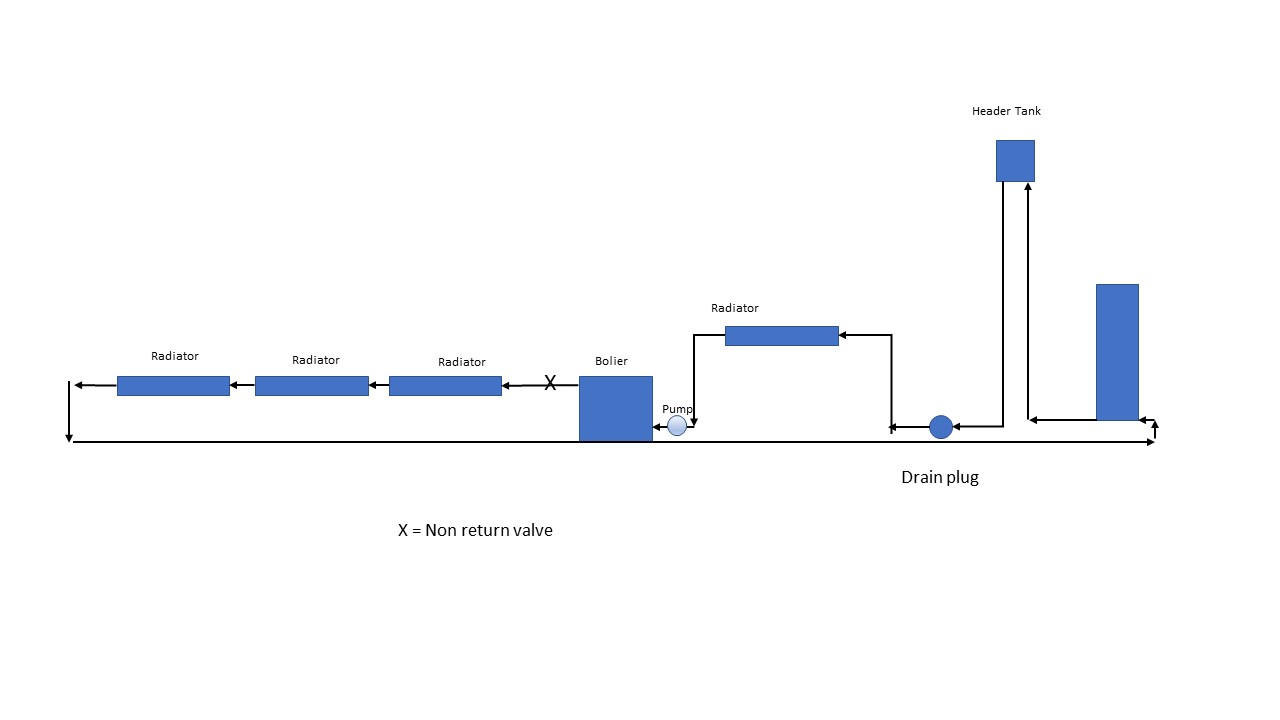
The highest point is the header tank. The return to the boiler goes from the header tank to floor level and the drain hole. Then it goes up to a radiator under the window next to the cooker and above the boiler. This radiator is 15cms higher than all the others and above the boiler, so, the drain plug has managed to drain one radiator and the return pipe from the header tank – hence the estimated 3 litres.
The rest of the contents, maybe another 8 litres are stuck between the boiler and the header tank via 3 normal radiators and a towel radiator.
I call Alde who were immense. I explain the problem and it’s apparently not uncommon. It’s plain for all to see that the one drain plug installed is not sufficient and when I tell them the make of the van, I’m told there won’t be another drain plug.
My options are:
– Clamp around the boiler and “hot swap” the hose with the pump. Trouble is there will be 3.25 litres of blue liquid gushing from the boiler (that’s what it holds). I can try to be quick but I can only connect one end of the pump because pipework needs cutting and modifying. I can try to catch the liquid in a vessel (space is v tight) or use a lot of towels.
– I can attach an air tool and blow the liquid round but I *think* this isn’t possible because of the location of a non-return valve in the boiler.
– I can look to break into the system at another radiator and deal with 8 litres of blue liquid
Realistically I think the first option is the only viable one but then I’d need potentially the Alde service pump to flush out the remaining blue liquid and I’d have a mess.
There is a motto which I don’t normally subscribe to “If at first you don’t succeed, GIVE UP”!!!
I asked the Alde service guy if he would carry out the work on a labour only basis using the materials I’d already bought and he agreed.
An unwelcome trip to Norhamptonshire coming up but a huge vote to Alde for being so brilliantly helpful, informative and flexible in dealing with this.
From Swift’s point of view, not the greatest of design achievements and more than a few warning signs here if you intend to do this work…
Be sure to read part 2…